Tuesday 30 March 2021

Water Colour Seashells

 This is an old technique but it turns out so beautiful every time.  You first spray your block with water and then drop two colours of reinker in various spots.   I used a few drops of Pear Pizazz and  more drops of Mint Macaron.  Then I spritzed the block again with water.  It looks so pretty as a background of water for the seashells.

I stamped the seashells and fussy cut them and glued them on.   I still had some Whale Time DSP so I cut a turtle out of that as it matched so nicely!


Monday 22 March 2021

Pop Up Seashell Card

 This is a really fun card to make.   I watch a lot of Dawn Griffiths videos and I learned how to make this card by watching one of her videos.   She used butterflies and I have chosen to use my Friends are like Seashells Bundle.   


The oval part of the card is held shut just by attaching a seashell that is just slightly larger than the oval hole which is made with oval dies.   The pop up mechanism is really easy to make.  This pictures shows the outside of the card and also the inside.   You really decorate the inside more because the card sits open as shown.   

Here is a little video which will give you the measurements and show you how to make it!


Sunday 21 March 2021

Laser-cut Paper


This time I turned the Laser paper around and used the white side.


I used my Rectangle Stitched Squares to make a frame.   I had some Blushing Bride Designer Series Paper and put a piece of that behind the the laser-cut paper.   I stamped two roses with Blushing Bride and added them and voila!
 

Sunday 14 March 2021

Beautiful Butterflies on Forever Gold Laser-cut Specialty Paper


Welcome again to our monthly West Coast Creators Blog Hop!   I am fortunate to be part of such a talented group of crafty crafters!  Enjoy all the wonderful butterfly cards we have created for you!

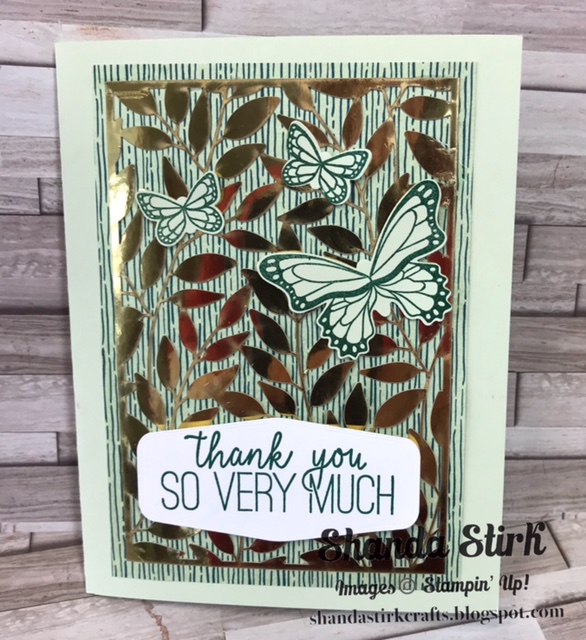
I am showcasing three butterfly cards in three different colours but all using the Forever Gold Laser-cut Specialty Paper found on  page 108 of Stampin' Up's main catalogue.  Here is my first card.
I used the Forever Greenery Designer Series Paper behind one of the panels of the Gold laser-cut paper.
The panels of laser-cut paper are 3 1/4" by 4 3/4" so then I cut the DSP behind it to be 3 1/2" by 5".  
I thought this was pretty enough so I didn't add another layer.   I used glue to adhere the gold leaves.
I then stamped the butterflies from the Butterfly Gala stamp set on Page 79 of our annual catalogue.  The sentiment is in the Butterfly Gala set and I stamped it onto a Tasteful Label Die as it seemed to me to be a perfect shape for that sentiment.  The card base is Soft Sea Foam.

This is the same design only using Magenta Madness.  I am not really a bright colour person but the gold looked so pretty on the In Color Designer Series Paper.   I did add an extra layer of Magenta Madness to this card which then is 3 3/4" by 5 1/4".  I stamped the butterflies on Magenta Madness cardstock and punched them out with the Butterfly Duet punch on page 165 of the annual catalogue.   I used the same dies for the sentiment as the card above.
I was going through Pinterest one day and saw that someone watercoloured behind one of these Gold panels and I thought it was lovely so I tried it!   I used Pear Pizazz cardstock as the base.   I cut my Shimmery White cardstock and the black piece just 1/8 of an inch bigger each time.   Then I watercoloured with the new Water Painters on page 147 of the annual catalogue.  One of those painters has a very fine tip brush and it was perfect for this.   I just squished the Pear Pizazz ink pad and the Mossy Meadow pad and then pulled a little ink to pain inside each gold leaf.   Isn't it amazing.   I had a Calypso Coral butterfly cut out with Butterfly Beauty dies also in the annual catty and thought one was enough.   The sentiment is from the Butterfly Gala stamp set.

  Next is a Facebook Live where I showed how to make these cards if you would like to try  these cards.   The Gold Laser-Cut paper really makes these easy to make and looks so amazing.

I hope you enjoy everyone's creations.     Just click on the picture below to go to the next blog on this hop!!


You are invited to the Inlinkz link party!

Click here to enter

Friday 12 March 2021

Easter Gift of Hope

 Easter is one of my favourite times of year.   There is so much to celebrate.   I loved this set and the message.   This is my first card I have created.    


I used Purple Posy for the base of the cardstock - 5 1/2" by 4 1/4"

Then I cut Highland Heather - 4" by 5 1/4"

The Basic White  piece is 3 3/4" by 5"

I stamped the sprig of leaves first in Garden Green and coloured in the flowers with Highland Heather.

I stamped the sentiment at the top in Garden Green and cut it out with my smallest stitched circle and cut out a Purple Posy  1 1/2" circle to go behind it.

Then I stamped the last sentiment in Highland Heather.


Thursday 11 March 2021

Butterflies on Gold Laser-cut Specialty Paper

 I bought this Gold Specialty Laser-cut Paper last summer and I have used a little here and there but now thought I would spend some time using it.   It is so lovely and easy to make beautiful cards with.   I have some Just Jade In-Colour Designer Series Paper and cut a piece to put behind the laser cut piece.   

The gold paper is 3 1/4" by 4 3/4" so I just cut the Jade DSP 3 1/2" by 5".   I stamped the butterflies from Butterfly Gala in Petal Pink and punched them out.   This is a quick but very pretty card to make!


Saturday 6 March 2021

Panel Cards

 We have meetings once a month for my West Coast Creators team.   When we meet one of our members demonstrates a technique or a new bundle and how we can use it.   This past month my friend Lisa demonstrated how to make these panel cards using the True Love Designer Series Paper.   I decided to give it a try!  You just take a small Rectangle Stitched Die and cut three squares out of a piece of the DSP.    Then you adhere them to a slightly larger piece of cardstock and it looks really neat when the pieces sit side by side only a little bit apart.


Aren't these pretty!!  I glued them onto a black piece and just used my Blending Brushes to add a little colour on the flowers to match the cardstock.      You can make the little panels any size.

Friday 5 March 2021

A Touch of Ink Returns


I am still using my Touch of Ink stamp set.   It is so lovely and makes great cards so easily!

I cased this design from Carol Creates.   I used different colours.  I am always trying to create with a colour I haven't used in awhile.    I chose Blushing Bride for the left one and Pumpkin Pie for the card on the right.  Both hummingbirds are stamped in Momento Ink to begin and then filled in with the stamp in the set that colours them - I used Garden Green.   I then coloured in the white spaces with Terra Cotta Tile.


The flowers were stamped with Momento Ink and then stamped with the fill in stamp using Blushing Bride and Pumpkin Pie.    I used the second largest oval die to cut out the picture and then used a scalloped die to put behind it.  They look so great and really took no time to make!