Sunday 14 April 2024

Retiring Products Blog Hop


Our Blog theme this month is to show off some of the products which will be retiring and no longer available in the new catalogue.   I am using the stamp set Rock Star and matching dies.  I play on the worship time in our church and I wanted a set to add to my other music sets so I could make cards for the team.

The guitar in this set is similar to the guitars everyone plays and I thought it would make nice cards. 


I used Highland Heather for the base and coloured the guitars with Highland Heather blend pens.  A few years ago Stampin' Up sold Silver stamp pads and I dipped my Wink of Stella in a drop of the silver reinker to colour the middle of the guitar.  I stamped the sentiment in Gorgeous Grape.  

 I cut the flashes out of silver foil cardstock.   Then I added a few stars  from the Adhesive-backed Lightning & Stars.  I used a 3 1/2" by 5 1/2" piece of the Rock & Roll Designer Series Paper.  I added a piece of the DSP to the envelope.  

It is a simple card to make but will be a great card for any musician and even anyone who loves music.


 Product List
You are invited to the Inlinkz link party!

Click here to enter

Thursday 14 March 2024

Colouring with Stampin' Blends


It is always fun to put out a challenge and see what people create!   This month we are featuring the Stampin' Blends and Stampin' Write Markers.    I love using them both depending on what I am doing.  These products are actually one of my favourite things about Stampin' Up.    They all match the  ink and paper so it so easy to come up with a great looking card!


I chose to make as simple a card as I could that would feature the Blends but be really easy to recreate!
I just used a 4" X 5 1/4" piece of the Exclusive Meandering Meadows DSP.   If you just look up Stampin' Up you will find this marvelous Designer Series Paper in the list of Exclusive products only available online.  It is so pretty and then all I had to do was stamp the images, cut them out, and colour them.

There are always two sets of Stampin' Blends - a dark and a lighter.   I use the dark to hightlight some spots and then go over everything with the lighter colour and then it gives the picture some texture.   I am only realizing now .....  I forgot to colour the flip flops.   :)   I did use a black Stampin' Write marker to extend the lines of the wood she is sitting on so it looked a little better and went to the edge of the paper I cut out.

I used Copper Clay Stampin' Blends for this bench and I liked the effect of using the darker and the lighter colours to make the bench look more realistic.  

Just click on the pictures below to see all the Coast to Coast Creations!


Product List

You are invited to the Inlinkz link party!

Click here to enter

Wednesday 14 February 2024

Mix and Mask


All the products this team is showing this month come from the new Mini Catalogue which is available from January to April 2024.   Sooooo many nice things!   The great thing about a blog hop is you get to see many products in the  wonderful creations from all our team members!

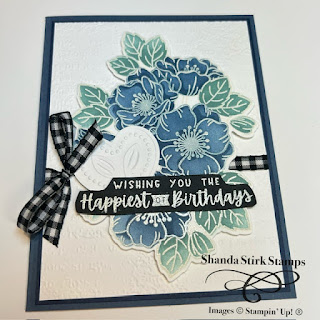
I chose the Mix and Mask products featuring the Enduring Beauty stamp set and masks.  I don't own it but my friend came for two crafting days and we used her set.   These masks can be found on Page 38 of the mini catty and you will be astonished  at the beauty of the flowers you create.   We didn't even make cards that day - we just experimented with colours and we embossed with white and gold powders.   Then we also just stamped.    I finally made the following card.


I used Misty Moonlight for the basic card.   Then I cut a 4 X 5 1/4" layer of Night of Navy to put behind it.  The white layer is cut at 3 7/8" X 5 3/8" and embossed with Timeworn Type embossing folder.    I stamped the flower stamp in Versemark and embossed with white powder.  The rest will just blow you away when you do it.   You use the masks which have great directions and raised numbers so you know which ones to use.   I used Lost Lagoon for the leaves and Misty Moonlight for the flowers.   

You use blending brushes to apply the colour.   The first layer makes the lighter colours you see and the second layer adds the depth and detail.   Honestly, the two of us just coloured for two hours and it was so amazing to see the stunning results.  

Just click on the pictures below to go to the next person on this Hop!


You are invited to the Inlinkz link party!

Click here to enter

Sunday 14 January 2024

Favourite New Product Blog Hop


Welcome again to our monthly Hop where our team features something new each month!   This month we are featuring all the new products which are available for Free when you make a qualifying purchase.  This year there are many free products and I am sure you will enjoy what everyone on the team has created with their favourite products.

When I first saw the Sale-a-bration catalogue the Flight and Airy Designer Series Paper was the first product I knew I needed!  It looks pretty in the catalogue but when you actually hold  it in your hands.... the cards are going to be endless.


This is one of the cards I have made using the paper.   You can use both sides of the paper which I have done with this card.  I got the idea for this card from Ann Driscoll from a card she had given me  - she recently died from cancer so I am dedicating this post to her.   

1.  White  8 1/2"  X  5 1/2" - fold in half
2.  Lost Lagoon 4 3/8" by  3 2/8"          
3.  1 1/2"  X  4 1/4" - two pieces of DSP
4.  I cut one bird  out of the DSP.         
5.  I cut 2 circles using the Deckled Circle Dies and stamped the sentiment
in Lost Lagoon ink.
6.  I used Seasonal Branches to cut out the twig and the blossoms.

You can try this design with many of the new papers available for free during Sale-a-bration!


Product List

You are invited to the Inlinkz link party!

Click here to enter

Thursday 14 December 2023

December Blog Hop


This December for our Blog Hop we are featuring products which are on Stampin' Up's Last Chance List.   These are items which are retiring and will no longer be available after the end of December.

You can just click on the pictures below to go to each team member's wonderful creations!

I have chosen to use the Night Divine Bundle as I have been using this suite of products almost nonstop since I first ordered it.    You can use it with so many colours and create beautiful cards.  The DSP that comes with this set has night scenes and sand scenes which I combined on this card. 


These are all the pieces I cut.  My die of Mary and Joseph was sticking so I put some wax paper on and ran that through.  Not only did my die work better but I thought the piece it cut out looked quite neat so I saved it for another card.    I made a background piece of Night of Navy and cut another piece of DSP a little smaller for the night sky.   I then cut a small piece of the brown sandy DSP to make the part to be behing the Nativity scene and used Border Dies to create a more hilly effect.    Copper Clay went best with the sandy piece so I used that with the Nativity Dies.


I used glue as adhesive for this project so that I had a little time to straighten a piece if I needed to.  I hope you will go and check out all the other wonderful cards! 


Product List

You are invited to the Inlinkz link party!

Click here to enter

Tuesday 14 November 2023

Coast to Coast Creators Blog Hop


Every month we have a blog hop and I always enjoy seeing everyone's creations.  This month our theme is Celebrate the Season.  I love this time of year and enjoy making Christmas cards for my friends and family.  Just click on the pictures below to travel to the other amazing creators on our team.

I needed some quick Christmas cards and am trying to use up the Designer Series Paper I have.    I cut up two sheets of DSP that were the same into pieces each 4" by 5 1/4".  I made six cards with the bottom pieces shown below and have six pieces left over to design some more.


I just used the dies from the Night Divine Bundle and then added the stable and the nativity scene.  I also cut out a star and added that.   Then I stamped the sentiment with Versemark and heat set it with my white embossing powder.  It was very quick and simple.

This part of the DSP makes a lovely background for the nativity scene which makes this card easy to make and very pretty at the same time.    And I have six more pieces to make six more cards - when I turned it over, I thought I could even make fall cards.
                                    

I thought I would post one card I made with the same DSP piece as in the card above and just stepped it up by adding some different colours (Wild Wheat and Night of Navy) and a different sentiment.


Product List

You are invited to the Inlinkz link party!

Click here to enter

Thursday 14 September 2023

New Product Blog!!!

You will LOVE all the new products now available!It is always exciting when a new catalogue is available with so many wonderful crafting ideas and items to order.  I hope we inspire you this month with our blog hop showing off some of the new available products.     

I have decided to use the Night Divine Suite of products and show it off in a fancy fold.   You might take a first look and decide it is hard but I will show you how easy it is and hopefully you will go and try it after I give you directions.  


This is a piece of cardstock cut 4 1/4" by 11".   You then score this piece on the long side at 5 1/2" and 8 1/4".    Then you need another Night of Navy piece 5 1/4" by 5 1/2 ".


You fold and burnish those folds with a bone folder tool.   You need to glue the smaller piece only to the bottom part of that fold.    Then it will sit up as you can see in the next picture. 


I cut out the camels in white and one king in white and adhered them to the card with dimensionals.  This is what makes the card sit up.    It will fold flat to mail.   

I cut one white piece at 4" X 5 1/4".    The DSP is 3 7/8" X 5 1/8".   You will need another of both of these pieces for the bottom.    I attached a white piece to the back to write on. 

I used Versemark ink for the sentiment and then used white embossing powder to make it stand out.  I then trimmed the sentiment piece and made the white piece 1/8" of an inch larger and put that up on dimensionals.  I added one star to perfect the scene.  


Product List

You are invited to the Inlinkz link party!

Click here to enter